Wednesday 24 April 2013

Why don’t you come on over, Valerie?

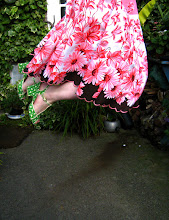
Well, Open Studios is over for another year, but I just wanted to show you our greeter-lady, Valerie.

valerie face

I have a folder full of display ideas, but I really wanted this one – a lovely vintage lady standee just like ones I had seen here on Nicky Grace’s blog.

Mum set to work and found the original on google images, she was a Jantzen advertising girl.

valerie original

We blew her up to just over 5 feet tall (from about 12”) and used a free website called blockposters.com to print her out tiled onto A4 sheets. Mum added a skirt and also a half moon to the bottom to help her stand up and to strengthen those little ankles.

valerie drawn out 1

Mum transferred the image to a sheet of 1cm thick MDF (£6 from Wickes for 2’ x 6’). Transferring an image onto a soft material like wood is easy – place the template over the top and redraw the lines, pressing hard with something like a ballpoint pen. When you remove the template you should be able to see the groove left behind by the pen.

valerie drawnout

The cutting out is the only bit I did! Mum’s not a friend of power tools, but I am. A quick whiz with the jigsaw and we had this:

valerie cutout

And then mum did her painting thing:

painting valerievalerie with original

You’ve got to admit, she’s very good at it!

valerie workshop 2

And here’s Valerie greeting visitors to our workshop!

valerie workshop

Isn’t she amazing?

Beccy

Monday 15 April 2013

Little pots finished…

In case you were wondering what I did with all that embroidery, here are my finished porcelain pots:

this one copyIMG_4482IMG_4483IMG_4484

The last few photos are from my display at Open Studios. The first weekend went really well, but it was very tiring! I’ll post more photos soon!

Beccy

Monday 8 April 2013

Embroidered letters take 2…

IMG_4352

I’ve been trying out something exciting for my current project! You remember these little porcelain pots I mentioned in this post?

IMG_4209

Well, those little recesses in the top are going to house fabric embroidered with lines from love letters from the war.

I scanned the letters into photoshop and cut and paste the bits I wanted onto an A4 sheet. I bought some water soluble paper from Barnyarns which is perfect because I could print the letters straight onto it. I then stuck the paper onto some old linen with spraymount and proceeded to (slowly) trace the letters using my super duper embroidery foot.

IMG_4354IMG_4355

What do you think? When I say slow, I mean slow – these two sheets took five hours over two days to sew. I’ve just started two more and the first one only took just over an hour so I must be getting quicker with confidence.

When I’d finished, I almost preferred the back!

IMG_4356IMG_4357

The paper just washes off in warm water, although it took a bit of coaxing out from under the stitches with a nailbrush!

IMG_4359

And the finished pieces…

IMG_4364IMG_4363

Not perfect, but I prefer it to the way a proper embroidery machine would have done it.

IMG_4365

I love the reference to going to the cinema to see ‘Major Barbara’ and having to walk home during the black-out!

It was really important to me that I not only used the content of the letters but also the actual handwriting too. It makes it more real, and although it was a lot of work I think it was worth it.

Shame I’m going to cut them up really!

Beccy

Wednesday 3 April 2013

Working like a demon…

I’ve been working very hard to make things for York Open Studios – I’ve pretty much got everything made and fired (bar a few stragglers!) but I still have to do all the decoration.

decalling

Once my work has been bisq and glaze fired, there is one final step – adding the decals. Decals are water-slide transfers that fire on to the glazed ceramic and become a permanent feature. The decals that I use are all reproductions of vintage images – I’ve even seen some of them on original vintage plates! – that I buy from a family company that has been producing them for a long, long time.

lots of decals

They come in a large sheet which you cut up then soak in water to release the decal from the backing paper. Then you slide it onto the glazed area and fire it in the kiln. Aren’t they beautiful? I must admit I can’t resist buying them.

I realised yesterday that I had about forty things to decal!

lots to decal

Half of them need the vintage decals and those little pots in the foreground will have custom decals that I’m waiting for (shouldn’t really have ordered them during the Week Of Bank Holidays!)

Well, I’ve managed to get the vintage ones done this morning. Tomorrow I’m going to make some little wheels for my little houses and as soon as the custom decals arrive, I’ll be applying them like mad! Then it’s all fire, fire, fire.

packaging arrives

I got some gorgeous packaging delivered this morning so I need to brand that too.

It’s all go round my house!

Beccy

Monday 1 April 2013

Easter trees…

Hey, am I the only one who’s never heard of Easter trees? We were in a charity shop and saw a little box filled with tiny Easter related ornaments, wondering why vintage cake decorations would have little hangers on them. The lady in the shop said they were Easter tree decorations, and are quite common around Europe.

Well, it turns out that it really is quite a common thing, just not in my house – check out this Google search!

This is our little bit of spring brought into the house for Easter, complete with our version of a tree. Mum grabbed some white acrylic paint, a branch and some moss and stuck it all in a cute green bucket we got from a floristry supplies shop. Finished with a red gingham ribbon and the decorations, I think it looks quite Eastery!

IMG_4335IMG_4336IMG_4338IMG_4340

Here are a few lovely Easter trees I found around the web, I particularly like the top one with the birds… some ideas for next year!

rosalineandmore.blogspot.com

http://rosalineandmore.blogspot.com

www.mabelslog.com

www.mabelslog.com

photoblog.nbcnewss.com

www.photoblog.nbcnews.com

Happy Easter everyone!

Beccy